Showing posts with label craft on a budget. Show all posts

Monday, January 30, 2012

A mother’s love.

Ever make something that you intend to give away as a gift, but you like it so much that you want to keep it?  But the gift has absolutely no validity in your life, so you must give it away?  For me, this was that craft.

I have a lovely friend who is due in about two weeks (!!!!).  Her baby shower was held a few weekends ago, and I was really excited to make something for her and the baby.  I found a quote I loved on Pinterest (ironically, it seemed that about 50% of the gifts from the shower were something I had run across on Pinterest…).  So, I claim no ownership nor originality of the quote, it is not mine!   I knew I wanted to turn it into some type of frameable art, so...

I decided to make my mom proud and design a cross stitch.  It took me quite awhile to do the math and decide how big letters should be, where they should go, how to design it, etc etc etc. 
You will need a cross-stitch canvas (I used 15 stitch/inch), thread, needle and frame.  When it comes down to it, it’s a fairly budget friendly craft, and it only took me about an afternoon from start to finish so it’s easy on the budget and on your schedule.

I tried and tried and tried to sketch a template, but I failed every time.  So I uploaded it as a PDF here.  Hopefully, that way it is viewable in a way that it could be recreated if you feel so inclined to do so.  It’s designed for an 8x 10 frame with 15 stitch cross stitch canvas.

Which brings me to the final product:
IMG_5517 

IMG_5516

Aaaand I am so excited to meet this little baby!!  Sharing here, here and here.


IMG_5513

Monday, January 16, 2012

Simple DIY Gift

I wanted to start 2012 with a simple DIY idea that requires few materials and just a little bit of time.  I’ve mentioned my friend Michelle before.  She is a creative genius and constantly gives me thoughtful, handmade presents.  So, there is a lot of pressure to return the favor…

Lately, I have seen lots of personalized hangers (they are all over wedding blogs).  I set out to make a personalized hanger, more for decoration and less for hanging clothes (the type of wire I had was a little rough, so not ideal for clothes).  I luckily already had the materials on hand (with the help of my fiancĂ©).  You will need:

IMG_5282

--a hanger
--pliers or something to bend wire
--wire (the fiancĂ© had this in the garage.  Next time, I would consider a thinner, easier to bend type)

Use the hanger as a comparison to mold the hanger.

IMG_5283

Start shaping the bottom.  I used her name, but I think some type of design would be wonderful as well (next time, I’m thinking tree outlines).

IMG_5284

The wire I had wasn’t quite as bendable as I would have hoped, so her name didn’t turn out quite as I had hoped, but I was still pretty happy with the end product.

image

Perfect as a wall hanging for a closet or bathroom or bedroom or wherever!  I also think it would be a cute wall hanging for dangly earrings.  Michelle is so imaginative, so I’m guessing she’ll put it to some creative use. 

It’s simple, quick, and easy to personalize, making it a wonderful gift.  Some places we like to frequent.

  image


Sunday, May 8, 2011

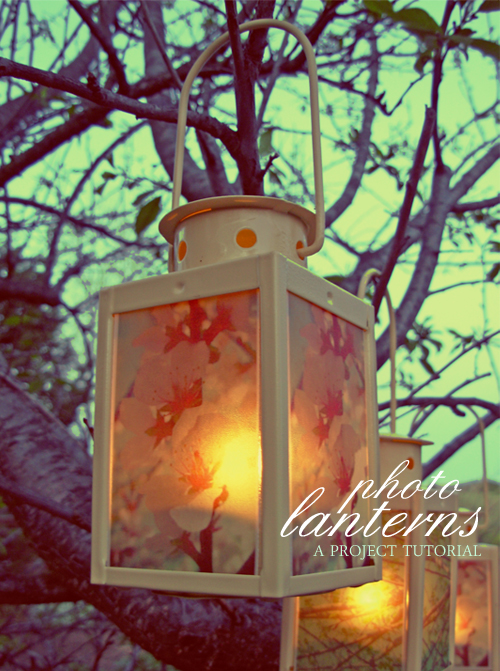
Mother's Day Photo Lanterns

“It kills you to see them grow up. But I guess it would kill you quicker if they didn't.”
-B. Kingsolver

This Mother's day, I felt I needed to do something special. And of course it had to be crafty. I started with asking each of my cousins to come up with three words to describe each aunt/mother and our grandmother. I ended up with a great list. There was some overlap in the words they chose, which was fantastic. After putting the list of words together, I used the free online program www.wordle.net to create a word cloud.
The word cloud created for my grandmother from the words generated by my cousins. I used a .pdf version but converted it here into a .jpg for display purposes.
But then I didn't really know what to do with it afterwards. It had so much potential! So I looked all around for ideas. And then a gorgeous one came to me that I just could not resist. It was the kind of project that took hold and you can't stop thinking about because you are so excited about. And that was something I hadn't felt in a while.


I found a tutorial on photo lanterns on Decor8. And oh boy they looked amazing. Not to mention the photographer there is phenomenal! (See right)

All you need: 
vellum
inkjet printer, with lots of ink
lanterns (mine are from Ikea)

Tip #1: You don't need spray adhesive I didn't have spray adhesive and I didn't really want to buy any. Another option was using Mod Podge to secure, but vellum tends to warp and bend when wet. I used the glass and the clips holding the glass up to keep my picture secure.

Tip #2: If you print on vellum, it takes a while to dry If you don't air each one out, it smudges. I learned the hard way.

Tip #3: Place the images outside the glass, not behind it (a.k.a. the picture should not be close to the flame!) The original tutorial doesn't specify which side of the glass the pictures go on.

Tip #4: Make sure the glass panes of your lanterns can be removed. Just sayin'.

I think that's all. The rest of the project is pretty self explanatory. Okay. Enough of the jibber jabber. LANTERNS!


After I presented them to my aunts, I received an overwhelmingly positive response, they were the talk of the town and I did have a couple aunties tear up with emotion. The words really hit home for those who put thousands of hours into the well being of their children but rarely heard kind words in return.


Click here to see all the places we link to!


Sunday, April 17, 2011

Easter Egg Mosaics

A challenge was scheduled for this week, buuuut I have an Easter craft I wanted to post, so the challenge will be postponed until next week.  Anyway, this craft is very simple and requires minimal materials, so I think you will find it easy to do with your own children (or students…or nieces, nephews, etc).
I teach in a Pre-K classroom at a Catholic school, and this week we were teaching a unit on the 5 senses.  So, we wanted all of our activities (including art) to incorporate the five senses.  Also, because we are swiftly approaching Easter, we wanted to add in an Easter component.

So, if you take the traditional route to celebrating Easter, you might dye eggs and have an egg hunt.  Well, what to do with all of those eggs after you have found them?  Crush them up into little tiny pieces and make tile mosaic art out of them (duh).  

We are having our Easter egg hunt next week, so we had all the kids paint the eggs in Easter friendly colors.

image

Then, crush up the egg shells into little pieces (have the kids do it if age appropriate). 


image

Then, we divided the eggs into cups for each student.  (Preventing any unnecessary, “He got more than me!” fights)

image

Brush a thin layer of Elmer’s glue onto a piece of paper (we used a thicker cardstock).  

imageimage

And press the pieces of eggshell onto the glue.  We used this as a teachable moment to talk about the sense of touch and how the eggshells feel and how sometimes you have to break them so they will be flat against the glue.  The kids did much better with this than I actually anticipated, and it’s a wonderful opportunity to develop fine gross motor skills.

imageimage

And here are the final products drying.  When I get back to school on Monday, I will use the rectangles to make a cross on our class bulletin board.  This will be a nice bridge between Easter traditions (egg dying) and the true importance of Easter for believers. 


image 
Love this activity because it’s (1) great way to recycle dyed eggshells instead of throwing them away (2) easily integrated with other ideas and concepts and (3) the kids really enjoyed it.  Happy (early) Easter!  Hope it’s family filled and beautiful.
image

Sunday, March 13, 2011

Inspiration arrives from all sources.

I have this extremely talented friend, Natalie.  Ironically, I met Natalie the same way I met Katelyn.  Fictionpress.net.  Natalie is an incredible author and you can find her work here and here.  She’s wonderfully creative and I’m lucky to have her as a friend because she inspired this post. 
Friday afternoon, she sent me a text that read: I challenge you.  I saw this at a store.  It is rolled up pages of a magazine on a pencil cup.  It could be a mixed media piece.  Pun intended :-).
image
So I was immediately up for the challenge.  And it was perfect timing because prior to Friday I wasn’t sure of what I would be posting today, so I am lucky to have you, Gnat. 
What you will need:
  • Some sort of cup (You could use a can.  But I was already using a big coffee container to hold some of my various pens/pencils/scissors/etc)
  • Old magazines
  • Hot glue gun
  • Scissors
IMG_3843-1
IMG_3844-1
First decide if you want to stick to a color scheme.  I considered only using warm colors, but then I decided to incorporate all colors.  Sift through old magazines and pick out suitable pages. 
image
It looks a little chaotic, but if you look closely, you will see some color piles (green purple, blue, red, grey, etc).  From there, the boyfriend helped roll up the individual pages and hot glued the edge so little roll would stay in place.
IMG_3851IMG_3855IMG_3856IMG_3857
I enlisted the boyfriend to help with these, which helped quite a lot.  It’s an easy task but semi time consuming, so a buddy would be useful.  IMG_3860
Again, I used the hot glue gun to glue them to the side of the coffee container.  I tried to line them up as closely as possible and made sure that the seams did not show. 
IMG_3861IMG_3862IMG_3863IMG_3864
The pages are taller than the sides of the coffee container, so after I glued on about four, I would trim off the tops. And, done!
IMG_3869IMG_3866IMG_3867
IMG_3843-1IMG_3875-2


 And now it has found a home on my desk where it adds some much needed color Smile The best part about this craft?  It was FREE.  Entirely composed of items that I previously owned.  I would like to try this craft again, maybe using old book pages.  
IMG_3872
IMG_3873


Sharing with other crafters here!

Monday, February 28, 2011

In the Beginning

If anyone has read the 'About Us' page of this blog, they would know that I had posted some craft pictures on my Facebook, which Maggie had seen and liked enough to ask me to join her in a blogging partnership. It wasn't a lot of pictures-- I was a novice (still am) but I had tackled my first big project and was so proud of it, I posted it up. And believe me, this was a big deal for me. I had NEVER been considered handy or creative, and for good reason.

But I loved to be a little off kilter (not too much) once in a while. I started to get more into design and palettes (thanks to internet) and was extremely jealous of all the DIYers out there who could make beautiful, functional things for less.

I thought I would try it out.

I have a blue/white/gold theme going on in my room (for the most part) and I was sort of cheaping out on getting a new desk chair. My parents collect stuff because they are also on the cheap side and we had a bunch of ugly dining chairs from way back in the 1980's or early 1990's that weren't really going away. I have to say, I'm the opposite. I periodically purge what I don't use or don't like.

But as we had a whole bunch of chairs, I thought it would be okay if I took just one and changed it up. And if something went horribly wrong, I had another 8 chairs of the same thing to start over. And it's not like we actually used these chairs anymore anyway.

Evenings like this are right for the crafting on the balcony. Also, my Dad would be really mad if I was sanding indoors.
 It was the summer/fall and it was still warm enough to sit outside in the evenings with a jacket, so I purchased a pack of sandpaper from the dollar store and got to work. The chair, as you can see, was a strange pine-looking wood with an awful orangey shellack. After unscrewing the blue seat from the frame (new skill #1!), I sanded every inch of that darn shellacky mess (new skill #2!)

Before: I don't know of a wood that is naturally orange

The sanding took a couple evenings to finish up. I wanted to make sure that darn shellack was gone. And.. this may not come as a surprise to you and may even be common sense (which doesn't come naturally to me), but you should wear gloves or something when you're using sandpaper.. I didn't have any fingerprints for about a week.

After the sanding came the painting (new skill #3!). I went into Home Depot (by myself, for the first time. I know, sad right?) and got plain white house paint (Um... new skill #4?). After a couple coats, I sanded it a little (to look distressed) and then put some spray varnish. After, the chair looked like this:


I decided not to do anything to the seat before I screwed it back on (I didn't want to get carried away, of course). But I am totally happy with the result. I use the back of the chair to hang all of my scarves, so it has two functions!

The mantra here at the Golden Means is "Form, Function and Creativity" and it's something that I think really holds true in everything we do. Success for an easy first project and I was hooked, absolutely, 100%.

All the scarves, on display!

Blogging tips