


Form. Function. Creativity.


 |
| The word cloud created for my grandmother from the words generated by my cousins. I used a .pdf version but converted it here into a .jpg for display purposes. But then I didn't really know what to do with it afterwards. It had so much potential! So I looked all around for ideas. And then a gorgeous one came to me that I just could not resist. It was the kind of project that took hold and you can't stop thinking about because you are so excited about. And that was something I hadn't felt in a while. 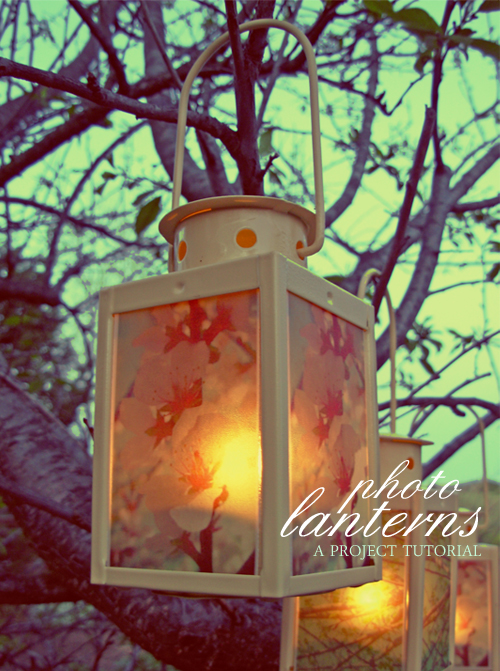 I found a tutorial on photo lanterns on Decor8. And oh boy they looked amazing. Not to mention the photographer there is phenomenal! (See right) I found a tutorial on photo lanterns on Decor8. And oh boy they looked amazing. Not to mention the photographer there is phenomenal! (See right)All you need: vellum inkjet printer, with lots of ink lanterns (mine are from Ikea) Tip #1: You don't need spray adhesive I didn't have spray adhesive and I didn't really want to buy any. Another option was using Mod Podge to secure, but vellum tends to warp and bend when wet. I used the glass and the clips holding the glass up to keep my picture secure. Tip #2: If you print on vellum, it takes a while to dry If you don't air each one out, it smudges. I learned the hard way. Tip #3: Place the images outside the glass, not behind it (a.k.a. the picture should not be close to the flame!) The original tutorial doesn't specify which side of the glass the pictures go on. Tip #4: Make sure the glass panes of your lanterns can be removed. Just sayin'. I think that's all. The rest of the project is pretty self explanatory. Okay. Enough of the jibber jabber. LANTERNS!      After I presented them to my aunts, I received an overwhelmingly positive response, they were the talk of the town and I did have a couple aunties tear up with emotion. The words really hit home for those who put thousands of hours into the well being of their children but rarely heard kind words in return.  Click here to see all the places we link to! |