Monday, February 28, 2011

In the Beginning

If anyone has read the 'About Us' page of this blog, they would know that I had posted some craft pictures on my Facebook, which Maggie had seen and liked enough to ask me to join her in a blogging partnership. It wasn't a lot of pictures-- I was a novice (still am) but I had tackled my first big project and was so proud of it, I posted it up. And believe me, this was a big deal for me. I had NEVER been considered handy or creative, and for good reason.

But I loved to be a little off kilter (not too much) once in a while. I started to get more into design and palettes (thanks to internet) and was extremely jealous of all the DIYers out there who could make beautiful, functional things for less.

I thought I would try it out.

I have a blue/white/gold theme going on in my room (for the most part) and I was sort of cheaping out on getting a new desk chair. My parents collect stuff because they are also on the cheap side and we had a bunch of ugly dining chairs from way back in the 1980's or early 1990's that weren't really going away. I have to say, I'm the opposite. I periodically purge what I don't use or don't like.

But as we had a whole bunch of chairs, I thought it would be okay if I took just one and changed it up. And if something went horribly wrong, I had another 8 chairs of the same thing to start over. And it's not like we actually used these chairs anymore anyway.

Evenings like this are right for the crafting on the balcony. Also, my Dad would be really mad if I was sanding indoors.
 It was the summer/fall and it was still warm enough to sit outside in the evenings with a jacket, so I purchased a pack of sandpaper from the dollar store and got to work. The chair, as you can see, was a strange pine-looking wood with an awful orangey shellack. After unscrewing the blue seat from the frame (new skill #1!), I sanded every inch of that darn shellacky mess (new skill #2!)

Before: I don't know of a wood that is naturally orange

The sanding took a couple evenings to finish up. I wanted to make sure that darn shellack was gone. And.. this may not come as a surprise to you and may even be common sense (which doesn't come naturally to me), but you should wear gloves or something when you're using sandpaper.. I didn't have any fingerprints for about a week.

After the sanding came the painting (new skill #3!). I went into Home Depot (by myself, for the first time. I know, sad right?) and got plain white house paint (Um... new skill #4?). After a couple coats, I sanded it a little (to look distressed) and then put some spray varnish. After, the chair looked like this:


I decided not to do anything to the seat before I screwed it back on (I didn't want to get carried away, of course). But I am totally happy with the result. I use the back of the chair to hang all of my scarves, so it has two functions!

The mantra here at the Golden Means is "Form, Function and Creativity" and it's something that I think really holds true in everything we do. Success for an easy first project and I was hooked, absolutely, 100%.

All the scarves, on display!

Sunday, February 20, 2011

You are a real ace.

Hello friends!!  I’m pretty excited about this post, because it is (1) easy, (2) inexpensive (3) quick and (4) a craft that men will genuinely enjoy.  I don’t know about everyone else, but I struggle to find a craft that the men in my life are clearly impressed with.
I am blessed to have this amazing group of friends.  There are five couples, and we try to get together once a month for dinner and games.  This craft began on January 28, the day of one our good friend’s birthday.  We were having a dinner/game night that evening in celebration.  Originally, I planned on buying him a poker set, but literally every store I went to was sold out.  I was quickly running out of time, so I decided to buy a pack of cards and try to quickly brainstorm something fun to do with them. 
Which brings us to the craft.
What you will need…
  • friends
  • pictures of said friends (I utilized the wonderful tool of facebook for this one)
  • printer and printer program
  • scissors
  • modge podge (or some other type of glue…  But this is what I had on hand)
  • paintbrush
  • a pack of cards
IMG_3671
Step ONE. 
Select photos of friends.  It worked out really nicely that we have a group of 10 friends.  I used 2 copies of the birthday boy and his lovely wife, and one of everyone else.  I found it easier to find them all online (facebook), save them to the same file folder on my computer, crop them accordingly.  I found that I cropped mine a little too close, as the faces were a little too big for the cards.  But oh well, they ended working just fine.  I was tried to find the most ridiculous photos possible, because these boys clearly enjoy making funny faces.
Step TWO.
Print the photos.  I used Microsoft Office Picture Manager.  Open the folder of the pictures in Microsoft Office Picture Manager, select all of the photos (use ctrl + click for each photo) and select File then Print.  In Microsoft Office Picture Manager, it allows you to select a variety of different printing dimensions.  I used the “contact sheet” option that allows you to print 35 itty bitty pictures on one sheet.  I am sure that other picture programs offer similar options if you do not have MOPM!
Step THREE.
Cut out the photos!  Tried to stay as close as possible to the face, I found that if you’re cutting out photos of your lovely female friends, it is best to include their hair as well, or they might look a little boyish.  I printed two copies of each person, just in case I made some mistakes (and I needed two of the birthday boy and wife)
image

Step FOUR.
Assign each person to a King or Queen.  The birthday boy and wife were assigned to the aces.  I used a sponge paintbrush to brush on a thin layer of modge podge to the playing card.  Then, I placed the face cut out onto the card.  Allowed the layer of glue to COMPELTELY dry and then brushed on another light layer on top.  Again, allowed to dry.
image   image


Step FIVE. 
Pack them up, slap on a nice message, throw on a ribbon and your personalized, crafter-tested, boy-approved gift is ready to be given. 
image
Enjoyed making them, enjoyed giving them.  Might consider making a pack for all of my friends, maybe themed pictures.  Perfect craft for any man in your life or when you’re in need of a fun gift but in  pinch for time and money!
image
Places for sharing, borrowing and connecting.

Sunday, February 13, 2011

Challenge 5: Pretty in Pink

C
This challenge came to us Valentine-themed. How so? To create something PINK! Fairly open ended, right? I thought so too.


Katelyn: Valentine's Day and I have a contentious relationship. Sometimes I hate it, sometimes I love it... it really depends on my relationship status. And keeping that in mind, I thought I would create something fun that was not dependent whether I was attached or single. There is no logical reason a day like V-Day should be considered the worst day of the year. I'm sure there's much worse. So... without further ado.. GLITTER FLATS
The Steve Maddens that Farah bought. Gorgeous... but pricey!


My friend Farah and I decided to each make our own pair, emulating the ones we spotted here. Farah paid a boatload of money for a pair of Steve Maddens and we thought, hey. Let's try this.


Farah is a little camera shy so I don't have pictures of her. But it's all about the shoes anyway.


 We started out with Mod Podge, glitter in a few colors (blue/silver/white for her, pink and red for my challenge), varnish, painter's tape (not shown) sponge brushes, yogurt containers and a metallic paint pen to cover up the weird scale pattern on the shoes. The shoes were bought were cheap 2 pairs for $15. Mine have a fabric bow at the toe which I snapped off. I would never wear a scale pattern outside, so I was pretty adamant that the glitter do a good job.
We went outside, as I was unsure how messy this project would be. I was actually quite happy that there was very little mess! But if you do end up doing inside, make sure you have paper towels and some sort of covering underneath.


We taped up the soles with painters tape underneath. Farah then used the pain pen to cover up some of the scale pattern on her flats but it turns out we didn't even need it

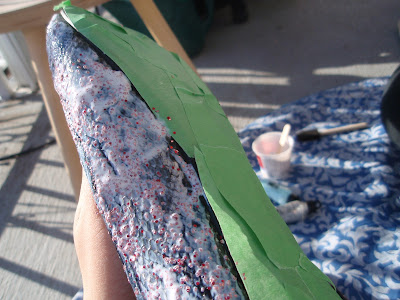
 The first layer is Mod Podge and a bit of glitter. Don't worry about coverage... it actually looks really gross at first. AND BE PATIENT. Wait for everything to dry COMPLETELY before putting on the next coat. Put THIN coats. Or else your flats will crack horribly and it will look terrible. That is what happened to my flats. But I will continue...
You can see the painter's tape. This is still the first layer.
This is the second layer. I know... it looks even grosser. I stress, put thin layers, NOT LIKE I DID HERE. I also think that fabric glue could be used... but I don't know for sure. Also, WAIT FOR THE LAYERS TO DRY COMPLETELY!!!!


 Layer 3-4, and looking pretty good. Not quite dry... but getting there!


Below: Our shoes drying in the sun.... Don't they look amazing? Especially Farah's flats???


Don't be fooled by the sun. It was freezing outside!
Farah's finished flats
My finished flats.. which did end up cracking... so be careful! But they look so gorgeous...


So what do you think? We made these flats for under $20 a pair. Compare that to the $90 flats in retail! Craaazy... Regardless, Happy Valentine's Day!


Well, hellooooo, loves.  When Katelyn decided on a “pink valentines” challenge, I immediately had direction.  You see, I bought these pillows last Black Friday, and since then, they have added a little extra comfort to my apartment.  

 Unfortunately, they’re kind of plain, and they have these annoying, long tags.  Lately, I have seen lots of amazing pillow designs, and I decided I wanted to make multiple pillow covers that I can change with the seasons.  So!  Here is my first design: LOVE.  (And what’s more Valentines-y than love?)
This adventure all started at Hobby Lobby, where I spent a ridiculous amount of time searching for the “perfect” fabric…(I usually do.  I am extremely indecisive.  The Hobby Lobby employees used to constantly ask me if I need help.  Now they know to just let me wander around until I make up my mind).  Extra bonus—the “love birds” print was 50% off, and the plain pink was 30%, so I was pretty happy to be crafty on a budget.  I bought 2 yds of the “love birds” and 1 yd of the pink paisley.  

My pillows are 18”x18” so I started by cutting out eight 19”x19” squares of the “love birds” fabric.  (I decided to make life easy for myself and use 1/2” seam allowances—this made the math and measuring much simpler…)  

For the backs of the pillows, I cut the 19”x19” squares into 6”x19” and 13”x19” rectangles.  And for the pink paisley letters, I decided to center them on the pillow cases.  To do so, I cut out four 10”x10” squares, and cut the letters out.  I also allowed for a ½” hem.  If anyone is interested, I would be more than happy to send out my pattern.  It would only be very useful to people interested in making 18”x18” pillow cases, and the pattern is written in hand on graph paper…But again, I’d be more than happy to send it out, just leave your email address!!

I hemmed all of my letters and pinned them onto the front of the pillow case cover, and set them aside to sew later.


Made a few strips of bias tape, and pinned it onto one of the 19” sides of the 13”x19” squares.  Pinned one of the 19” sides of the 6”x19” squares to be hemmed later.  

Then off to the sewing machine!  Started by sewing the letters on, then sewed the hem and then the bias tape.  

Finally, placed the letter side UP, then placed the bias taped rectangle pattern side DOWN and pinned it in place.  Then placed the hemmed rectangle pattern side DOWN and pinned it as well.   


Sewed everything together, flipped the pillow case inside out, stuffed my pillows inside and ta-da!!  Done!   


(Let's ignore the fact that I have a futon...I am a poor, grad student, and it was free)
For fun, you can make your loved one pose for silly pictures, but they WILL retaliate by attacking your face.  Consider yourself warned.   

(Some places for inspiration!)
Happy Valentines day, from The Golden Means!


Sunday, February 6, 2011

Apple Tarts: A Story in Pictures

As a child, I was told that sweet, sugar crusted apple dumplings were the secret of a Chinese baker in Vancouver. No matter how much money he was offered, no matter how many people asked, he never once gave out his prized recipe.

The coveted apple tart from a Vancouver bakery, photo from Sherman's Food Adventures

The recipe was kept under lock and key and locals lined up out the bakery doors to bring home a batch of the coveted bun-shaped pillows of hot, sweet, tender, flaky pastries. They say that he died with that recipe, and no how many times other bakers tried to emulate his apple tarts, none of them came out quite right.

Fast forward ten years. Add a talented aunt with a generous spatula.

The story continues with 2 packages of frozen puff pastry, a can of apple pie filling, flour, milk and sugar.

Each package of puff pastry thawed overnight, unknowingly resting before each square was to be divided into pieces of six, totalling twelve pieces per package. In total, 24 pieces of pastry were borne.

Before mitosis
One piece of puff pastry, after the split


Each piece of puff pastry was laid down in a pat of flour and flattened with a floured rolling pin. After cutting the apples in the filling down to small confetti-sized bits, I scooped a small amount and placed it in the middle so that it resembled a fried egg, sunny side up.


After brushing the edges of the pastry with milk, pinch the edges of the pastry together


Turn over the tarts and brush the tops with milk and dip in white sugar. Place down onto parchment paper pinched side down. Or get your brother to help you.

By the way,  ignore what's on TV. Obama and Harper had a joint press conference... that's all.


 At this point they can be frozen, but it is infinitely better to bake them fresh. They can be warmed up in the oven later. They will puff up a golden brown, the apple filling will bubble and swell, the baker's secret will now be yours to exploit, the family's compliments will come your way, and all the boys will conspire to make you theirs.

Bake at 400 degrees F for 15 minutes, 25 minutes if frozen or until golden brown. They look almost like medallions of gold, to the greedy.

My mother volunteered me to make these for Chinese New Year dinner before she even told me. Immediately, my family was impressed and ravenous, stealing glances towards the oven, sniffing the air in a way that was extremely obvious. Let the pastries sit before serving, as the filling inside will be extremely hot. Even grudging curmudgeon-y uncles will give you a nod and grunt of approval. And nobody will make comments about how you'll be on old maid the rest of your life.

Blogging tips