
We are excited to post our newest Mystery Item Challenge. Basically, it all started about one week ago when we assigned each other two "mystery items".
Katelyn's mystery items for Maggie:
Jar (lid optional)
Paint
Maggie's mystery items for Katelyn:
Magnet
Buttons
The results...
I brainstormed a handful of options to use a jar and paint...At first, my ideas were limited to pretty generic ideas (i.e. a decorated pot for kitchen herbs, a container for a homemade candle, a jar of cookie mix...) But then I realized all of my ideas revolved around the jar functioning as some type of container (boring). So, with some brainstorming help from the boyfriend, I decided to use the jar as a means to completing the challenge, rather than the final product. So...
Materials:
- 1 yard black fabric
- 1 yard white fabric
- 1 yard gray patterned fabric
- cutting mat
- scissors or rotary cutter
- acrylic paint (blue, black, gray)
- textile medium
- 3 jars (all of varying sizes)
- paper plates
- paintbrushes
- 1 inch bias tape maker
- thread
- iron
Steps:
Cut fabric into 12 x 18 in. rectangles (need four black and four white).

Mix 2 parts acrylic paint with 1 part textile medium on paper plate. Dip the bottom of the jars in the paint, and press onto white fabric. I was going for a sporadic pattern. I used the smallest jar with the black paint (7 circles), medium jar with the gray paint (5 circles) and the biggest jar with blue (7 circles). I wanted to keep the number of circles consistent so one didn't overpower the others.

Let dry. Acrylic paint is semi washable, so that's why it's important to the use the Textile Medium. It makes the acrylic paint more permanent, but according to the bottle yo have to heat set it. After the paint has dried, place a towel on your ironing board, place the designed fabric, paint side down and iron. Now I don't have to stress out about washing these if/when they get dirty.

With gray fabric, make bias tape. This was my first time making my own bias tape, so I won't walk you through the steps, because I am no expert. I found this video tutorial which was much more helpful than the tiny directions provided by the bias tape maker package.

Pin white fabric to black fabric, then pin on bias tape. Sew!

And that's it! Done!


 | |||
| Love that they are reversible :) |
There you go! Initially, I had no idea what I was getting myself into (new to textile medium, new to bias tape making, etc)... But oh well. I like the way they turned out.

I have to admit, I had similar problems when I got my list. Buttons and magnets. The simplest thing to do would be to put them together, right? So I did just that. I found cardboard buttons and glued them between a glass marble and a magnet using tacky glue.


And then I thought... well that's boring. Part of being crafty is cleverness (at least, that's what the foxes say). And not being terribly pleased with the button magnets, I tried something new.
First I tried to think about the functions of the two items. Unfortunately, their functions are the same. They make things come together. And magnets don't have any aesthetic function at all. So I thought, well... I am not even going to consider their original functions. So one thing led to another, and I made a key rack without needing to use any hardware tools:
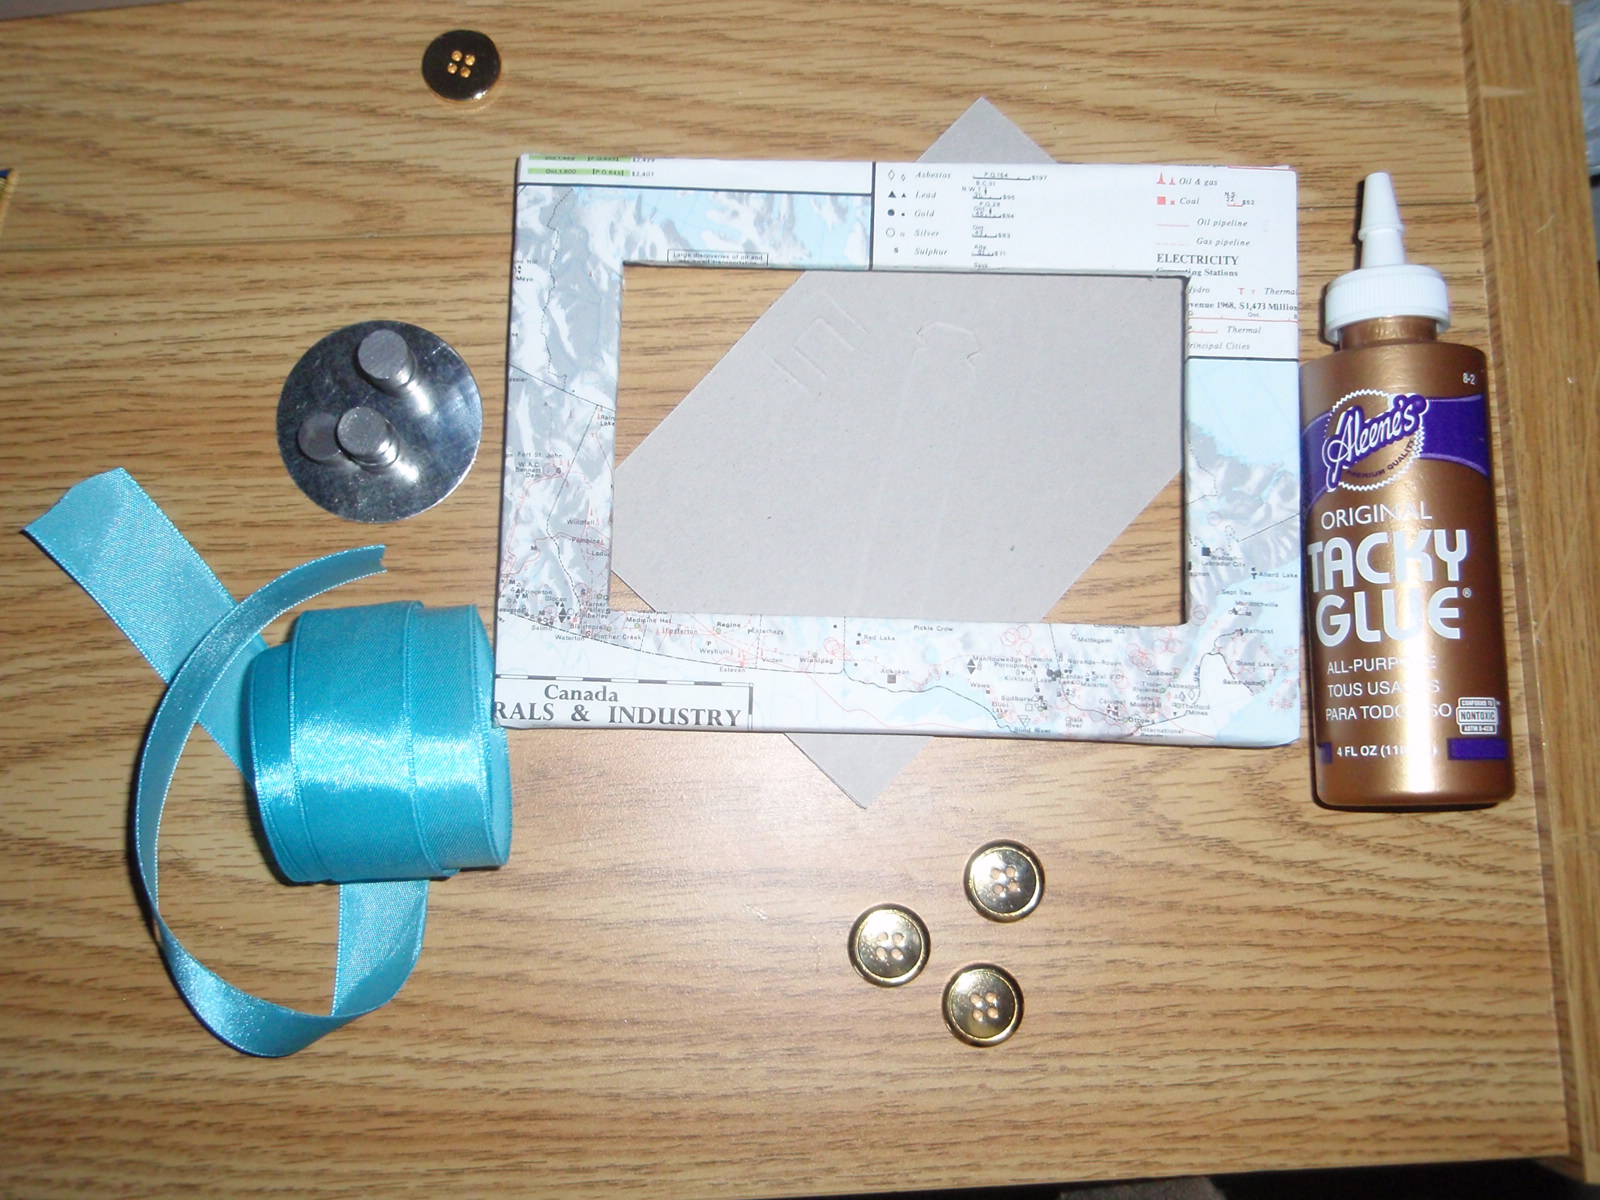
What you'll need:
- Picture frame (Mine is a plain wood one from Ikea that I covered in a vintage map of Canada's minerals and natural gas resources. Why? I don't know.) Frame must include the glass/plastic and cardboard backing
- Tacky glue
- Flat buttons
- Plain magnets
- Fabric ribbon
- Magnetic sheet that comes with the magnets

Wrap the ribbon around the glass, making sure to have the magnetic sheet underneath so that the magnets will be able to stick to them through the ribbon.
Put everything back into the frame to make sure you have no ribbon bits sticking out.


I chose to mount mine above my bedroom mirror beside the door so I stop losing/forgetting my keys!


Find our links here at these wonderful places of inspiration!
Ahhhh, love it!! it looks amazing!! I completely love the travel theme and would never have thought of that...I might have to make one because right now my key holder is just a boring plastic hook...
ReplyDeleteHaha the travel theme only got me once I had finished the project. I think we did a fantastic job. I am linking us up to some parties right now. Both of us, so I am doing one from mine and then one from yours so we are both represented!
ReplyDeleteBRILLIANT! as Ron Weasley would say.
ReplyDeleteBoth super creative with the mystery materials that you used. I really really love the magnet board. I'm considering making one for my room.
The use of the Jars for the placemats was a really neat twist too! Just BRILLIANT!
Oooo....I really what you did with the buttons. Great ideas!!!
ReplyDelete