Monday, December 20, 2010

Challenge 3: Mystery Items

Hello and happy holidays to all!
We are excited to post our newest Mystery Item Challenge.  Basically, it all started about one week ago when we assigned each other two "mystery items".

Katelyn's mystery items for Maggie:
Jar (lid optional)
Paint

Maggie's mystery items for Katelyn:
Magnet
Buttons

The results...

I brainstormed a handful of options to use a jar and paint...At first, my ideas were limited to pretty generic ideas (i.e. a decorated pot for kitchen herbs, a container for a homemade candle, a jar of cookie mix...)  But then I realized all of my ideas revolved around the jar functioning as some type of container (boring).  So, with some brainstorming help from the boyfriend, I decided to use the jar as a means to completing the challenge, rather than the final product.  So...

Materials:
  • 1 yard black fabric
  • 1 yard white fabric
  • 1 yard gray patterned fabric
  • cutting mat
  • scissors or rotary cutter
  • acrylic paint (blue, black, gray)
  • textile medium
  • 3 jars (all of varying sizes)
  • paper plates
  • paintbrushes
  • 1 inch bias tape maker
  • thread
  • iron
Steps:

Cut fabric into 12 x 18 in. rectangles (need four black and four white).


Mix 2 parts acrylic paint with 1 part textile medium on paper plate.  Dip the bottom of the jars in the paint, and press onto white fabric.  I was going for a sporadic pattern.  I used the smallest jar with the black paint (7 circles), medium jar with the gray paint (5 circles) and the biggest jar with blue (7 circles).  I wanted to keep the number of circles consistent so one didn't overpower the others.


Let dry.  Acrylic paint is semi washable, so that's why it's important to the use the Textile Medium.  It makes the acrylic paint more permanent, but according to the bottle yo have to heat set it.  After the paint has dried, place a towel on your ironing board, place the designed fabric, paint side down and iron.  Now I don't have to stress out about washing these if/when they get dirty.


With gray fabric, make bias tape.  This was my first time making my own bias tape, so I won't walk  you through the steps, because I am no expert.  I found this video tutorial which was much more helpful than the tiny directions provided by the bias tape maker package.  


Pin white fabric to black fabric, then pin on bias tape.  Sew! 


And that's it!  Done! 


Love that they are reversible :)


 There you go!  Initially, I had no idea what I was getting myself into (new to textile medium, new to bias tape making, etc)...  But oh well.  I like the way they turned out.  


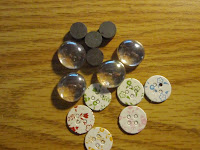
I have to admit, I had similar problems when I got my list. Buttons and magnets. The simplest thing to do would be to put them together, right? So I did just that. I found cardboard buttons and glued them between a glass marble and a magnet using tacky glue.

And then I thought... well that's boring. Part of being crafty is cleverness (at least, that's what the foxes say). And not being terribly pleased with the button magnets, I tried something new.

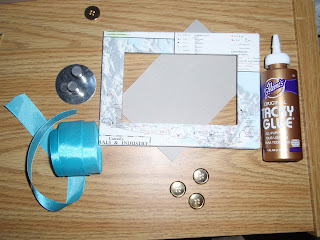
First I tried to think about the functions of the two items. Unfortunately, their functions are the same. They make things come together. And magnets don't have any aesthetic function at all. So I thought, well... I am not even going to consider their original functions. So one thing led to another, and I made a key rack without needing to use any hardware tools:

 What you'll need: 

  • Picture frame (Mine is a plain wood one from Ikea that I covered in a vintage map of Canada's minerals and natural gas resources. Why? I don't know.) Frame must include the glass/plastic and cardboard backing
  • Tacky glue
  • Flat buttons
  • Plain magnets
  • Fabric ribbon
  • Magnetic sheet that comes with the magnets

Cut the magnetic sheet into pieces. (However many hooks you want to make, so three hooks would need three pieces of the sheet) 


Wrap the ribbon around the glass, making sure to have the magnetic sheet underneath so that the magnets will be able to stick to them through the ribbon.


Put everything back into the frame to make sure you have no ribbon bits sticking out.
 Glue every piece so that you have nothing unglued. Each hook is made of 2 magnets stuck to the pieces of metal sheet hiding underneath and then reinforced, as I glued the magnet to the ribbon and then the next magnet to the first. I then glued the button to the top magnet.

You can decorate however you want! I went with a sort of travel theme.


I chose to mount mine above my bedroom mirror beside the door so I stop losing/forgetting my keys!


Find our links here at these wonderful places of inspiration!

    Saturday, December 11, 2010

    Wrapping paper and jewelry display


    Hello!

    This one is a little different-- I won't be posting a tutorial. Instead, I am featuring two mini-crafts that I have done lately that I hope you'll enjoy.

    First I want to start with the jewelry display. I have always had problems organizing necklaces, untangling chains, searching for the earrings... I never had a real jewelry box (I put everything in a kiddie jewelry box until... I made this display...) It came as a present. Unfortunately, I already received another cork board for my workspace.

    It originally had a black frame, but I painted it white in crafter's acrylic (it took a few coats). It hangs in my bathroom beside my sink! Easy access and much less hassle. I used regular sewing pins from the dollar store.


    Place the pin through the backings if there are no hooks

    No hole in the backings? Just push it right in...

    Like so

    I don't recommend it for special, secret, expensive jewelry, as this is meant for what you are okay having on display. None of my baubles up there are pieces that are meant for the safety deposit box. But the rest of them? Why not display? The end result? Like treasures in a museum.

    Lots of compliments, and I never lose my jewellery anymore! It's like having art in the bathroom... but functional.

    My cousin graduated from college years ago, and kept his textbooks. Understandable, right? Textbooks are expensive (think upwards of $120 each, used for 4 months). He thought that they would be a helpful resource for later years when he was in the work force.

    He was wrong. Turns out, textbook knowledge expires very quickly. And once the publishers come out with a new edition (which they invariably do, every other year), past editions are toast. No more. Useless.

    My dear cousin wanted every last cent from those books. So he tore out every page and used it as wrapping paper.

    Which brings me to craft number 2: Home made wrapping paper. I wanted to get a little more festive and creative, so I dug out a box of paper that had been sitting in the garage that my dad swears we have owned since 1988. It's used for spreadsheets and is huge and cumbersome and takes up a whole lot of space.
    The box of paper beside a standard bottle of wine so that you can get an idea of how much paper there is in there. Sorry about the angle!

    I decided to paint and make up my own gift wrap without spending any money and it turned into a very satisfying 90 minutes. All you need is acrylic paint, paper (if you don't have a large box of spreadsheet paper lying around, use newspaper! Example below..)
    Just make sure that the newspaper is appropriate and doesn't have shady advertisements or upsetting stories!

    This is a great one for kids if you are able to let them have at it. Wrap gifts for family members in paper decorated by your kids for an extra-meaningful gift. I found that the best brush was actually a roller brush, but you have so much free reign. Add sparkles, sequins, stickers, anything.
    Present wrapped in silver home made gift wrap, used silver crafter's acrylic paint and a roller brush. Surprisingly quick to make (about 45 seconds) and better looking than I had really expected!


    Photobucketmonogram
    UndertheTableandDreaming


    Thursday, December 2, 2010

    Advent Calendar Take Two

    Typically, Katelyn and I have decided on posting on Sundays to balance out our hectic schedules...  I asked to post a little early this week, because it's a little time sensitive.

    A couple of weeks ago, Katelyn uploaded a personalized, adult style advent calendar.  Today, I am happy to provide a traditional, kid friendly version of the advent calendar.  This is an activity I made for my preschoolers (I work at a religious school, so no worries about church and state separation).  We're learning about advent (bonus craft idea: we are also making our own advent wreaths out of plates painted green and toilet paper rolls painted purple (3) and pink (1)).  Four and five year olds are naturally very excited for Christmas, and so far they have really enjoyed counting down the days (only 23 more to go!!).

    Materials:
    Advent Calendar Print Outs (see below)
    Red/Green paper (or whatever you prefer, that's just what I had on hand that matched the Christmas-y spirit)
    Glue
    Colored Pencils (or markers or crayons or whatever)
    Creative children 

    I pre-cut all of the number squares for the kids.  


    I glued them all to decorative paper and then I passed them out randomly (with the mentality: you get what you get and you don't throw a fit.  Surprisingly, they did not fight over who got the Santa or who go the gingerbread man).  


    The kiddos colored them in with colored pencils. 


    Now they are ready to be displayed.  In our classroom, we have a "dramatic play" center (play kitchen, dress up, etc).  In the home, we put up a green-butcher-paper Christmas tree, where we are taping up the advent calendar.  I will upload pictures later, when we have a few more days up.  They all love their Christmas tree advent calendar and cannot wait for when we will get to the number that they decorated.

    Feel free to save the advent pictures to your computer and print out for own use!!  Hope everyone enjoys.  If anyone uses them, I would love to see pictures of the finished product!!

    Print outs:


    Or download the PDF for the exact sized documents.


    To visit some wonderful places where this craft was linked, see oh the places we go!


    Sunday, November 28, 2010

    Challenge #2- Seeing green...tea.

    Instead of waiting every 4 posts to do a challenge, both Maggie and I had so much fun with the first one that we decided to do a challenge every 2 posts. So we'll see how that goes!


    This time around we are using green tea to make up any concoction. I blanched at first when Maggie suggested that this be the challenge--- I was so stuck and bewildered that I can honestly say that I wasn't sure if I could accept this challenge. I didn't even know where to buy matcha powder. But I did anyway.


    It took me a full two weeks to find the right idea for this challenge. Among the rejects (and they were a bizarre lot) were: green tea ravioli, green tea pasta and green tea sauce. Uhhh.. gross. But then I thought, Green tea mousse! And that was brilliant, until I realized I had no idea how to make mousse and had never used matcha powder. I wasn't really ready to take that leap.


    But then... one thing led to another, and I present today:


    Green tea creme caramel (also known as flan):

    Ingredients:
    Matcha powder.. no English
    1/3 cup sugar
    3 tablespoons water
    Butter for greasing
    3 large eggs, plus 1 egg white
    1 cup whipping cream
    1 cup skim milk
    1 tsp vanilla extract
    1 tsp fine grade matcha powder
             NOTE: I had a hard time with the matcha. You can buy it at your local asian supermarket in the tea section.  Unfortunately all the packaging is in Japanese. And nobody that I know well enough to get matcha for me is Japanese or reads Japanese. The only label in English said 'Ingredients: GREEN TEA'.So I did what any logical person would do. I felt the packages. I noticed that some were different prices than others and that some felt different. Some felt grainy and others were finer. I went with the finest (and consequently, most expensive) matcha there was. I reccommend getting the finest you can find. Nobody likes grainy dessert.
    2/3 cup sugar
    pinch of salt

    Start by dissolving 1/3 cup sugar and water over medium heat, stirring constantly until the mixture is tinted golden brown. Pour into buttered ramekins (I used 2 large ramekins because that's all I had, but you can do six little ones) until bottoms of ramekins are coated. Set aside.

    Before the bake
    In a large bowl, whisk together eggs (and extra egg white), vanilla, milk, cream , sugar, and salt. Once combined, take a small amount of the mixture and blend it together with the matcha powder for even green tea distribution, mixing it back into the bowl when fully blended.

    Distribute mixture into ramekins evenly and place into baking dish. Pour water into the baking dish until the water reaches about an inch deep. Bake at 350 degrees. If using two large ramekins, bake for 1 1/2 hours. If using six small ramekins, bake for 45 minutes. Let chill for at least 3 hours.


    Once chilled, unstick edges with a knife and tip 
    upside down. Watch for liquidy caramel! So tasty! Ok. No it doesn't look pretty. But it really does taste good, I promise!


    I found it funny that Katelyn was so uneasy by this challenge, because it was originally her idea!! (Yes, Katelyn, check our messages, you were the one to first bring it up =) NOTE FROM KATELYN: I remember throwing this challenge on the board... I just never expected to be voted on so soon! Also. I thought that I would have a better idea by the time we came to this challenge.. whoops!).  I was pretty excited because I already had a green-tea craft in my repertoire.  So unlike Katelyn, this challenge was fairly easy for me…  So I present to you a green tea body scrub.

    Materials
    • 1 cup sugar
    • 5 tablespoon Epsom salt
    • 8-12 teaspoons of olive oil (if you have oily skin, I suggest using less…If you have dry skin, I suggest using more)
    • 2-3 teaspoons honey
    • 2 bags green tea
    • 2 bags lemon green tea
    • Small palmful of crushed mint
    • Small palmful of rosemary
    • Bowl
    • Spoon
    • Jar with lid (I used an empty, thoroughly cleaned out salsa jar.  I had previously decorated it with spray paint & acrylic paint)
    This is a fairly customizable recipe...You can use fresh lemon zest, but only if you indeed to use the scrub immediately (the zest can mold over time).  Or you could use orange or lime zest (I would be curious to see how well a green tea, lime, dried basil scrub would turn out...)  You could also add Vitamin E, essential oils, dried flowers (I've used lavender before), etc.  This is the first time I have used mint and rosemary, I enjoyed the minty-fresh scent of the mint/rosemary combo.  I like this recipe because it's fairly dry compared to other homemade scrubs and it's convenient because chances are you have most of the ingredients (if not all of them) at home!
      Directions


      Pour sugar and Epsom salt into bowl.  Mix!


      Pour olive oil and honey into 
      sugar-salt mixture.  Mix!


      Cut open bags of tea, add to sugar-salt-oil-honey mixture.  Mix!


      Pour in mint and rosemary.  Mix!


      Put into jar.  Glue on labels (optional, see template, click on image, right click, "save image as" to save to your computer). 


      Perfect for a gift for a friend, or for yourself!  It smells minty and the green tea helps exfoliate to leave all skin types feeling nice and smooth.


      Blogging tips