Showing posts with label repurposing. Show all posts

Sunday, May 8, 2011

Mother's Day Photo Lanterns

“It kills you to see them grow up. But I guess it would kill you quicker if they didn't.”
-B. Kingsolver

This Mother's day, I felt I needed to do something special. And of course it had to be crafty. I started with asking each of my cousins to come up with three words to describe each aunt/mother and our grandmother. I ended up with a great list. There was some overlap in the words they chose, which was fantastic. After putting the list of words together, I used the free online program www.wordle.net to create a word cloud.
The word cloud created for my grandmother from the words generated by my cousins. I used a .pdf version but converted it here into a .jpg for display purposes.
But then I didn't really know what to do with it afterwards. It had so much potential! So I looked all around for ideas. And then a gorgeous one came to me that I just could not resist. It was the kind of project that took hold and you can't stop thinking about because you are so excited about. And that was something I hadn't felt in a while.
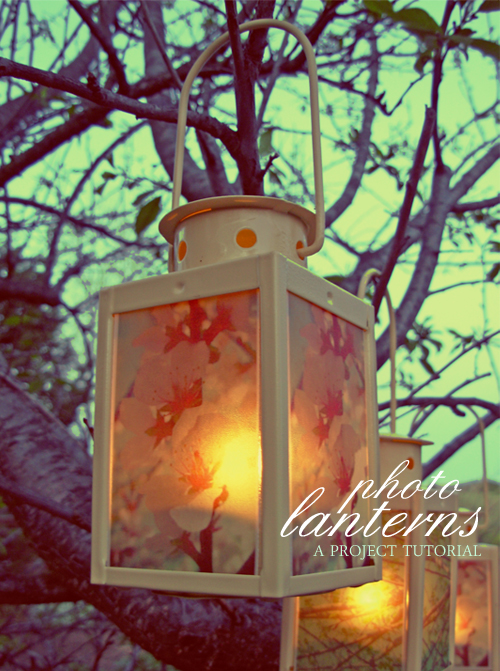


I found a tutorial on photo lanterns on Decor8. And oh boy they looked amazing. Not to mention the photographer there is phenomenal! (See right)

All you need: 
vellum
inkjet printer, with lots of ink
lanterns (mine are from Ikea)

Tip #1: You don't need spray adhesive I didn't have spray adhesive and I didn't really want to buy any. Another option was using Mod Podge to secure, but vellum tends to warp and bend when wet. I used the glass and the clips holding the glass up to keep my picture secure.

Tip #2: If you print on vellum, it takes a while to dry If you don't air each one out, it smudges. I learned the hard way.

Tip #3: Place the images outside the glass, not behind it (a.k.a. the picture should not be close to the flame!) The original tutorial doesn't specify which side of the glass the pictures go on.

Tip #4: Make sure the glass panes of your lanterns can be removed. Just sayin'.

I think that's all. The rest of the project is pretty self explanatory. Okay. Enough of the jibber jabber. LANTERNS!


After I presented them to my aunts, I received an overwhelmingly positive response, they were the talk of the town and I did have a couple aunties tear up with emotion. The words really hit home for those who put thousands of hours into the well being of their children but rarely heard kind words in return.


Click here to see all the places we link to!


Sunday, March 27, 2011

Challenge 7: Imitation is the sincerest form of flattery.


People are so creative and are capable of making beautiful things. I often get green with envy at all the things that I see on the internet and think, "Why didn't I think of that? How can I make it?"


I am constantly looking for new things at my favourite places of inspiration, Design*Sponge and craftgawker.

So though I have so many things on my crafting bucket list, I chose to emulate these fabulous Moroccan-style jars.
The originals found here, done by Katie Steuernagle

My version


I didn't have glass paint, like the DIY called for, so I mixed food colouring with Mod Podge. And I didn't have Puff paint, so I used a metallic paint pen. :>
 Grab old glasses or jars and make sure all labels are off and everything is clean. Lids are optional but I chose to keep them away.
Using a few drops of food coloring and generous amounts of Mod Podge, mix together everything with a paintbrush or popsicle stick until well blended


 Swirl around the mixture until the entire insides are coated
Let dry. It will take a long time.
When dry-ish, you can use puff pain or the paint pen to decorate however you like! I'm not so good drawing freehand, especially geometric patterns. As you'll see.

 The paint pen exploded all over me while I was drawing on the red glass, making me look like
C-3PO. :(
Almost dry!


I have a huuuuge list of crafts I want to try.  I am continuously amazed by everyone’s level of creative genius, and often feel like my attempts pale in comparison to others.  Needless to say, when Katelyn decided on the copycat challenge, I had more than enough options to choose from.  Like here, here, here or here.  And maybe in the future, I will copy one of those…  But not today. 
I needed a craft that wasn’t too time consuming and ideally requiring few materials.  Which brought me to Katie @ Knitstorm’s Eco Tutorial – Shopping Bag to Shipping Envelope
((Disclaimer:  I am not in any way, shape or form claiming any ownership of Katie’s ideas, instead I would like to credit her with a great idea, and a wonderful tutorial))
I am blessed insomuch that I have some wonderful friends.  Some that, sadly for me, live far away.  Washington, Illinois, Canada, Indiana, Iowa, etc.  I’m a big fan of mailing them letters and packages.  Typically, I buy those bubble-package-envelopes, but those are surprisingly expensive.  (Well, that, and I am extremely cheap, but that’s besides the point)  So when I found Katie’s tutorial I was pretty excited to find a green, budget friendly, homemade envelope!
What you will need:
image
I followed Katie’s steps for the first portion of the craft.  So instead of explaining step by step, I will let you visit Katie’s tutorial for directions and show you via pictures of what I did. 
                    IMG_3880IMG_3881IMG_3882
I wanted to make the envelopes about the size of a CD case, so…
                  IMG_3889IMG_3883
                  IMG_3884IMG_3885  
                   IMG_3886IMG_3887
IMG_3888
This is where I slightly deviated from Katie’s tutorial.  She wraps whatever she is sending in a plastic grocery bag before putting it in the envelope and sending it out, to make it waterproof!  Instead, I wanted my envelopes to more closely resemble bubble-wrap-envelopes, so I decided to cut plastic bags in square pieces.
                IMG_3890IMG_3891IMG_3892
Then I cut out square pieces of scrap fabric I have (I’m always looking for ways to use my ridiculously abundant collection of scrap fabrics).  And layered the plastic bags on the envelope, then the fabric, and then pinned everything in place.
                  IMG_3897IMG_3898
IMG_3900
I experimented with several different scissors, fabrics, envelope dimensions, types of bags, etc and eventually compiled a group of eclectic envelopes.
IMG_3908
And then I was off to the sewing machine. 
IMG_3910
Finally, the finished products. 
IMG_3913IMG_3916IMG_3922
Instead of sewing them shut like Katie did in her tutorial, I think I will use small amounts of tape.  Ideally, I would like people to be able to use these envelopes again (taping blank paper over the address and return address and writing on the new recipient—I typically reuse bubble wrap envelopes this way, as Katelyn already knows…((NOTE FROM KATELYN: Haha actually I did not know this, I thought that customs was always really interested in what I was getting and that's why the envelopes had been preopened.)))IMG_3925


Basically, to sum everything up…I think Katelyn and I immensely enjoyed emulating other people’s crafts.  I think this is a challenge we will definitely have to repeat again in the future.  And here are some of the places that offer us inspiring new crafts that we just might have to attempt for ourselves in the future!!  Happy Sunday!

Saturday, December 11, 2010

Wrapping paper and jewelry display


Hello!

This one is a little different-- I won't be posting a tutorial. Instead, I am featuring two mini-crafts that I have done lately that I hope you'll enjoy.

First I want to start with the jewelry display. I have always had problems organizing necklaces, untangling chains, searching for the earrings... I never had a real jewelry box (I put everything in a kiddie jewelry box until... I made this display...) It came as a present. Unfortunately, I already received another cork board for my workspace.

It originally had a black frame, but I painted it white in crafter's acrylic (it took a few coats). It hangs in my bathroom beside my sink! Easy access and much less hassle. I used regular sewing pins from the dollar store.


Place the pin through the backings if there are no hooks

No hole in the backings? Just push it right in...

Like so

I don't recommend it for special, secret, expensive jewelry, as this is meant for what you are okay having on display. None of my baubles up there are pieces that are meant for the safety deposit box. But the rest of them? Why not display? The end result? Like treasures in a museum.

Lots of compliments, and I never lose my jewellery anymore! It's like having art in the bathroom... but functional.

My cousin graduated from college years ago, and kept his textbooks. Understandable, right? Textbooks are expensive (think upwards of $120 each, used for 4 months). He thought that they would be a helpful resource for later years when he was in the work force.

He was wrong. Turns out, textbook knowledge expires very quickly. And once the publishers come out with a new edition (which they invariably do, every other year), past editions are toast. No more. Useless.

My dear cousin wanted every last cent from those books. So he tore out every page and used it as wrapping paper.

Which brings me to craft number 2: Home made wrapping paper. I wanted to get a little more festive and creative, so I dug out a box of paper that had been sitting in the garage that my dad swears we have owned since 1988. It's used for spreadsheets and is huge and cumbersome and takes up a whole lot of space.
The box of paper beside a standard bottle of wine so that you can get an idea of how much paper there is in there. Sorry about the angle!

I decided to paint and make up my own gift wrap without spending any money and it turned into a very satisfying 90 minutes. All you need is acrylic paint, paper (if you don't have a large box of spreadsheet paper lying around, use newspaper! Example below..)
Just make sure that the newspaper is appropriate and doesn't have shady advertisements or upsetting stories!

This is a great one for kids if you are able to let them have at it. Wrap gifts for family members in paper decorated by your kids for an extra-meaningful gift. I found that the best brush was actually a roller brush, but you have so much free reign. Add sparkles, sequins, stickers, anything.
Present wrapped in silver home made gift wrap, used silver crafter's acrylic paint and a roller brush. Surprisingly quick to make (about 45 seconds) and better looking than I had really expected!


Photobucketmonogram
UndertheTableandDreaming


Blogging tips